
Sugar art and cake design

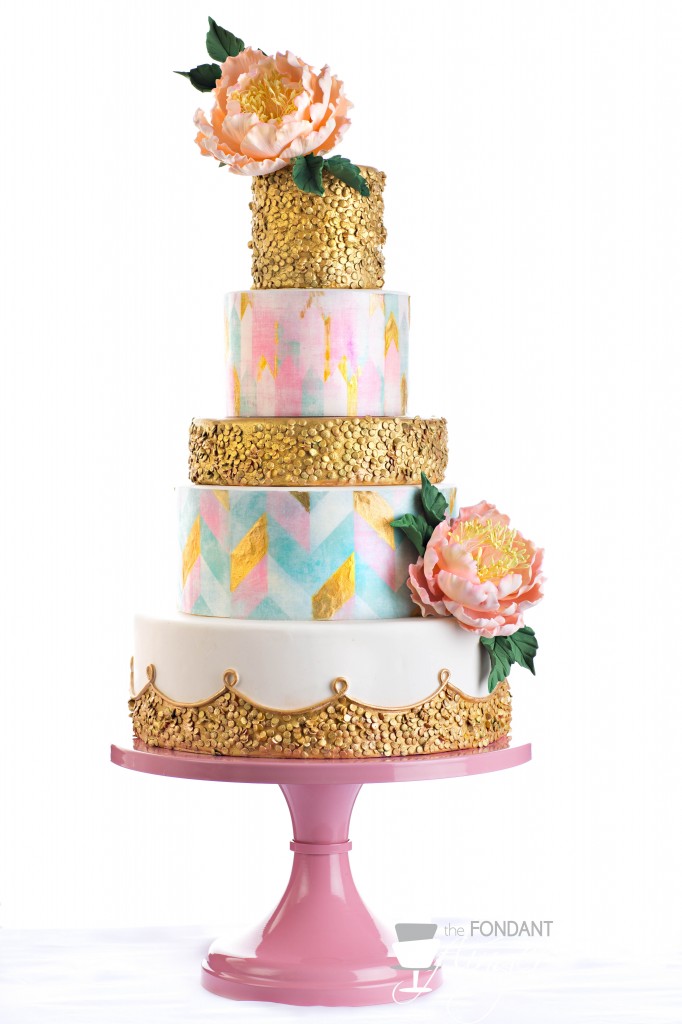
The perfect wedding cake design? Essential. The perfect wedding cake stand? Crucial. Every cake designer knows that the perfect cake, if not presented properly feels lacking. My preference? The cake pedestal. There is just something so appealing about a cake on its pedestal. Now, finding the perfect pedestal is no longer an issue. Sarah’s Cake Stands just launched its Picture Perfect stand collection in bold, bright and beautiful colors. To celebrate the new line, I designed this cake to coordinate with Sarah’s “At First Blush” stand. I knew the photos had to be nothing short of spectacular so I called in the talented Lee Lopez Photography and he captured these insanely gorgeous photos.
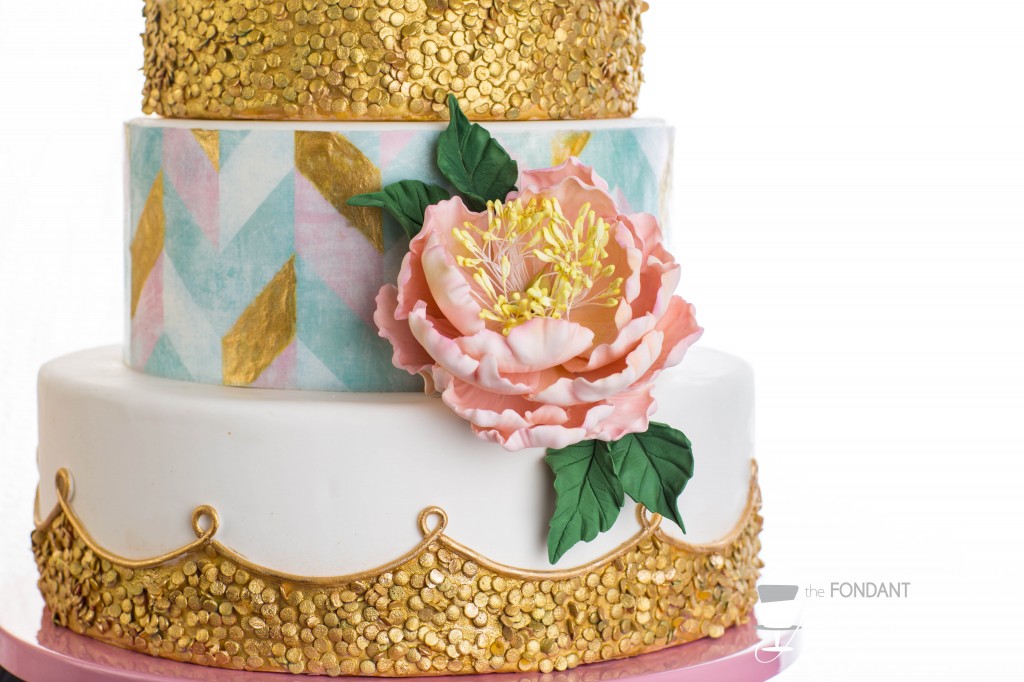
 The stand truly makes this cake. The burst of color and shine at the base of the cake accentuates the shine of the gold sequins and the burst of color on the herringbone design. You can read more about my design process for this cake at Sarah’s Stands Blog.
 Giddy does not even begin to describe my elation when I finally assembled all the tiers. I got so excited that I shot the photos over to Carrie at The Cake Blog who so graciously did a write up of her own (which you can read here).
Don’t forget to check out all of the new colors from Sarah. I warn you though, prepare to be inspired!
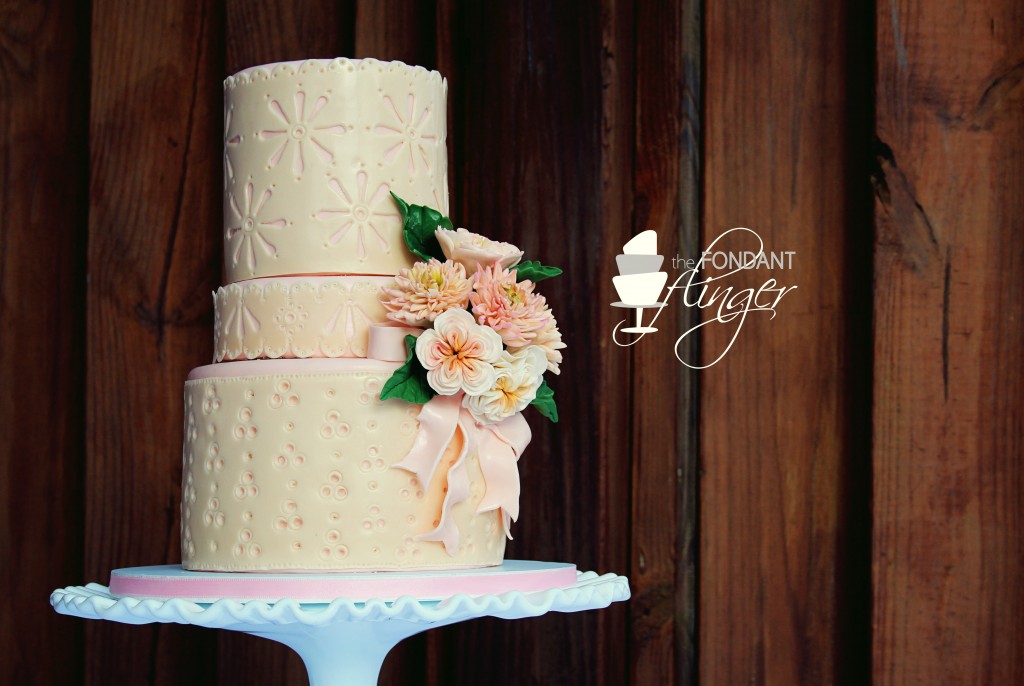
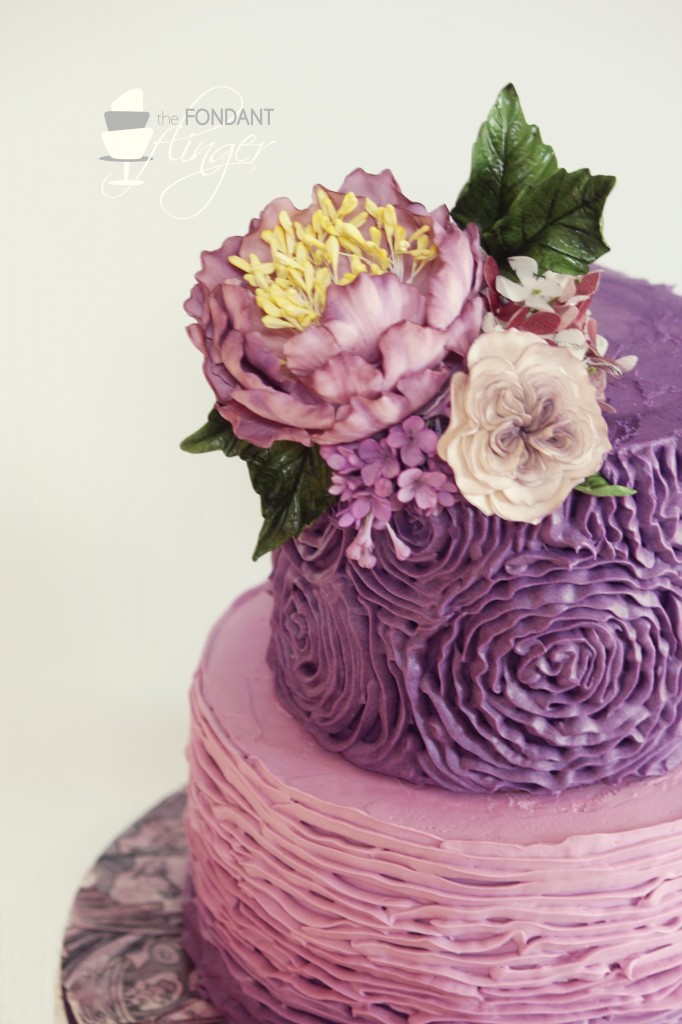
This past weekend I had the opportunity to fly out to California and spend some time with some dear cake friends. We laughed, we ate amazing food, we relaxed and we created sugar flowers. 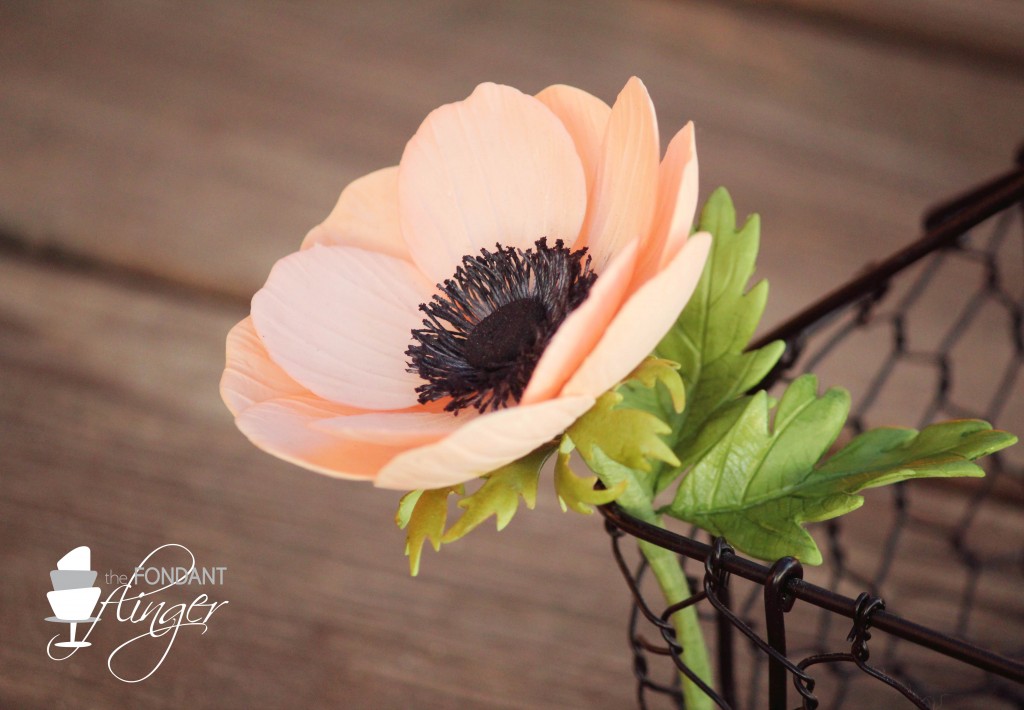
Our delightful and inspiring hostess invited us into her home for the weekend, though to simply use the word “home” doesn’t quite do it justice. The gardens alone were enchanting; one of those rare places where time seems to stop and you can fully enjoy the beauty of God’s nature surrounding you. Somehow even the dirt in the garden seemed to inspire me.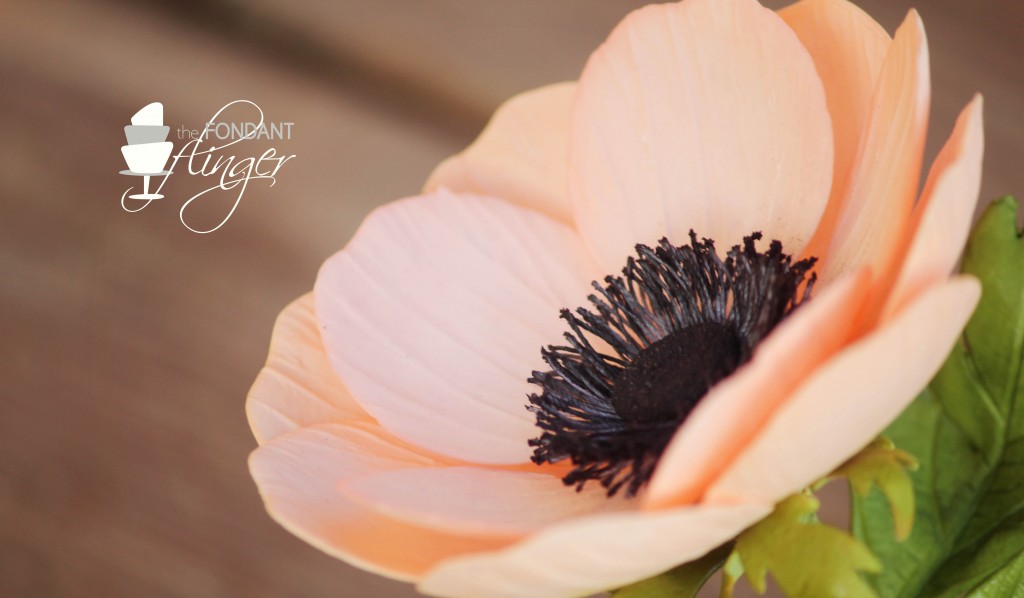
Another guest joined us as well this weekend who happened to be my lovely friend, Jacqueline Butler of Petalsweet Cakes. In fact, I had met our delightful hostess while studying with Jacqueline last year (you can read about that amazing class here).
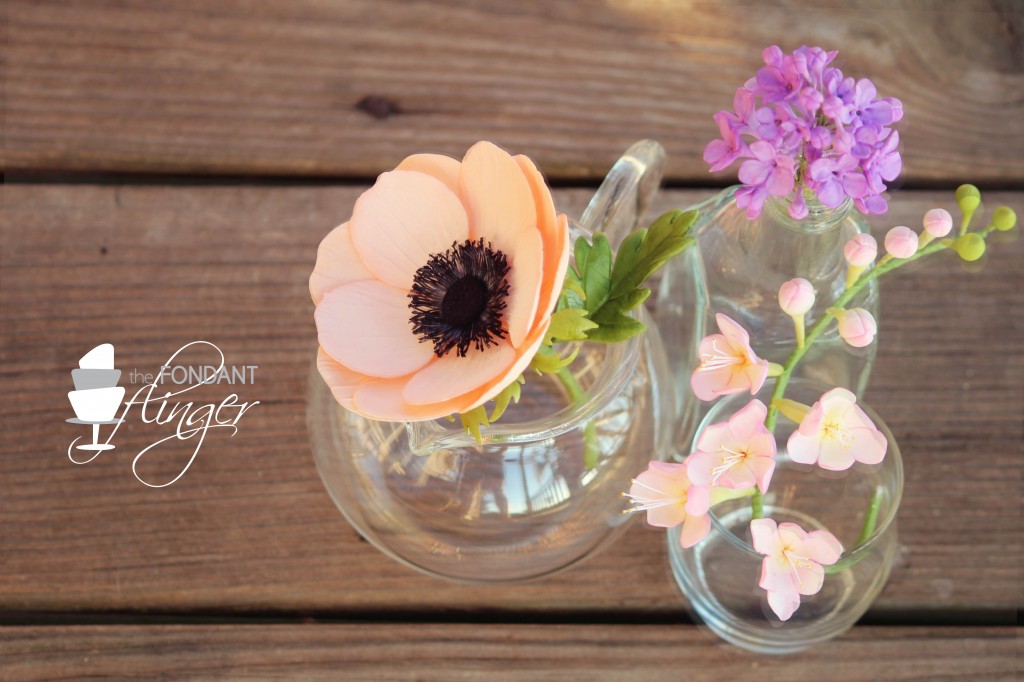
So my weekend consisted of being with the ladies I admired and making beautiful sugar art together. Not too bad of a way to spend a weekend, eh?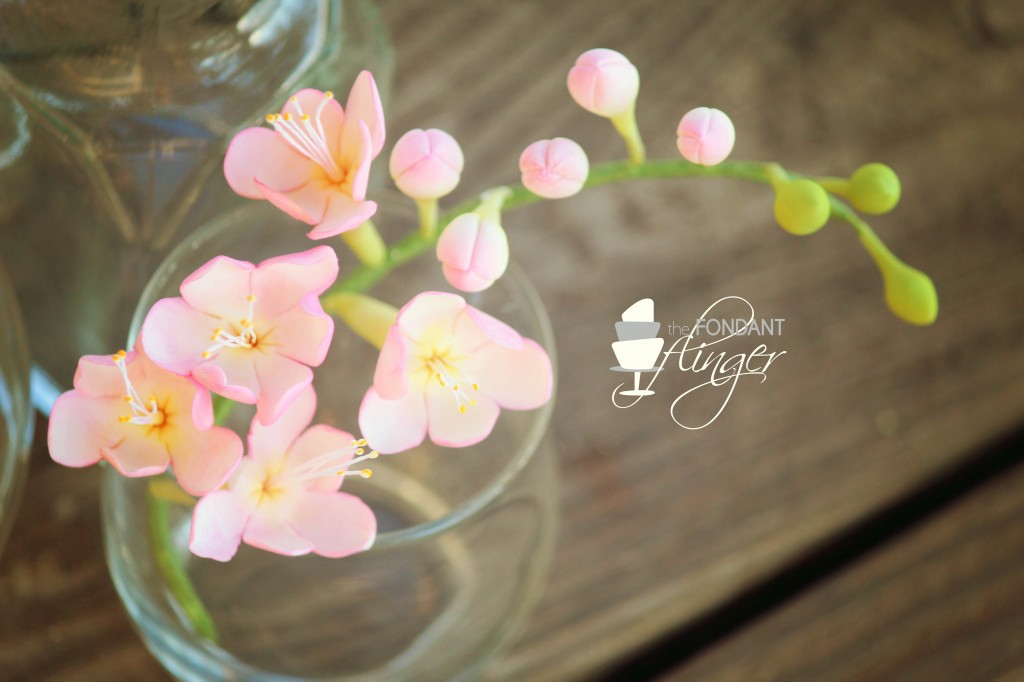
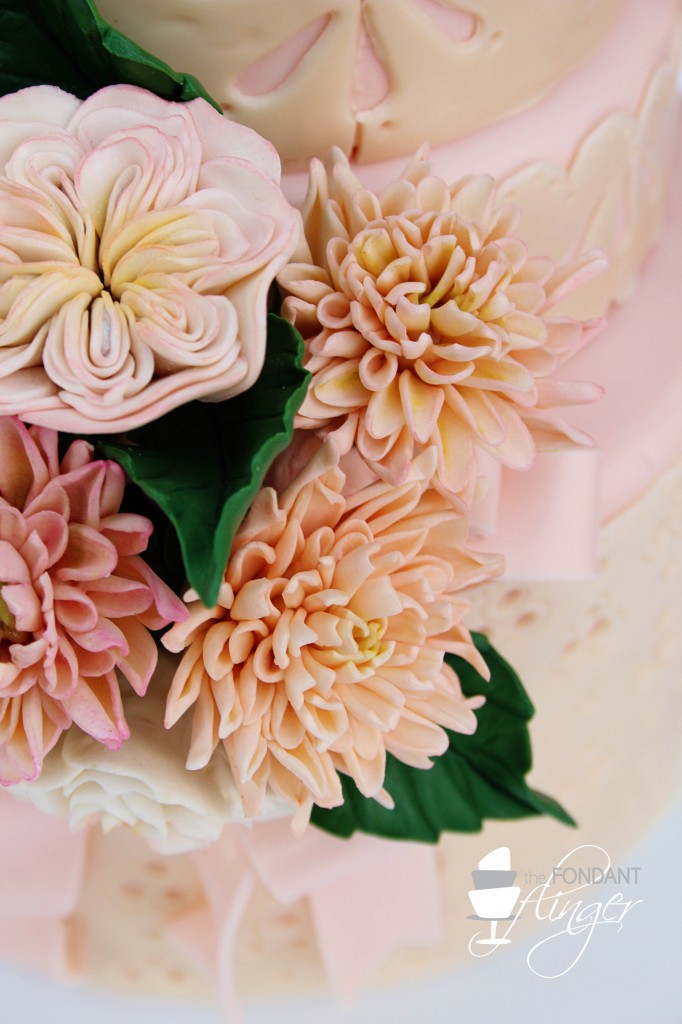
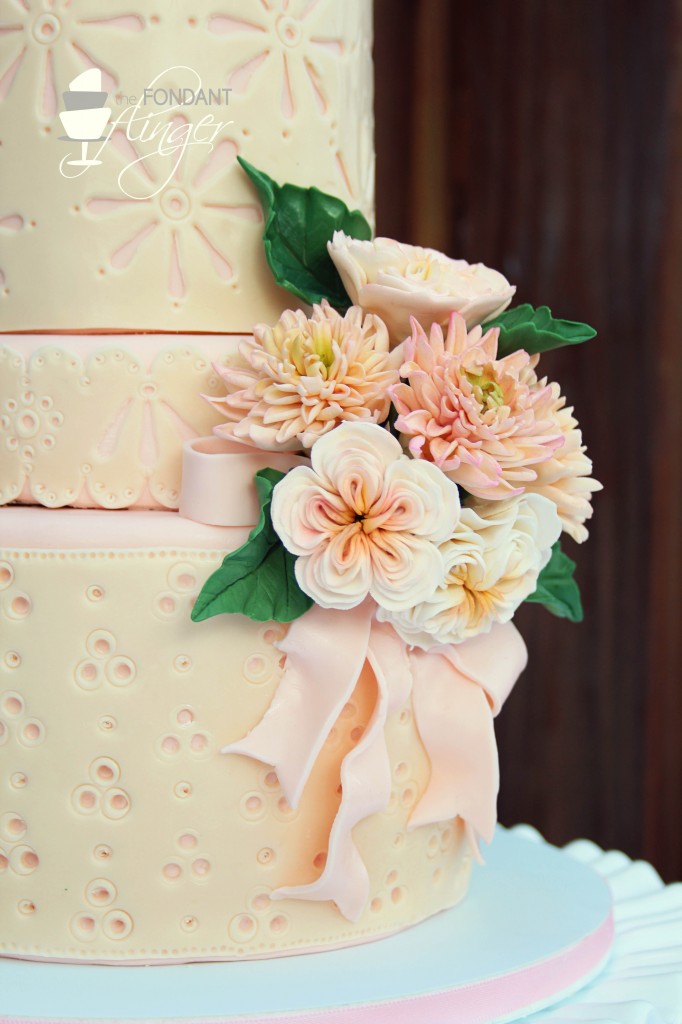
During our time together, we crafted anemones, freesia, and lilacs within this delightful, intimate and inspiring setting. Needless to say, I didn’t want it to end. 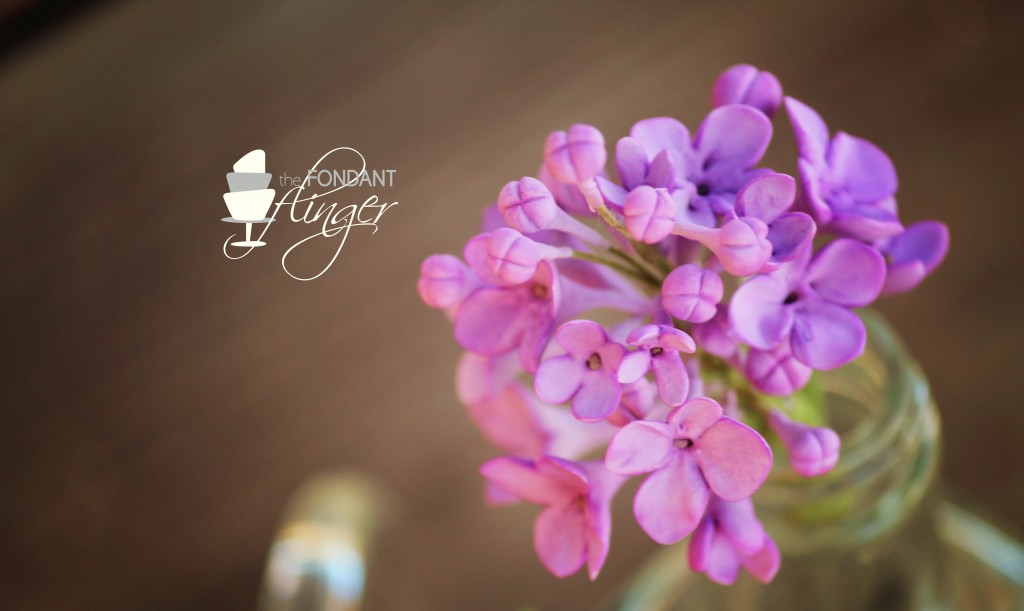 But sadly, all good things must too come to an end. However, this time, not only did I create beautiful flowers, I also left with beautiful friendships.
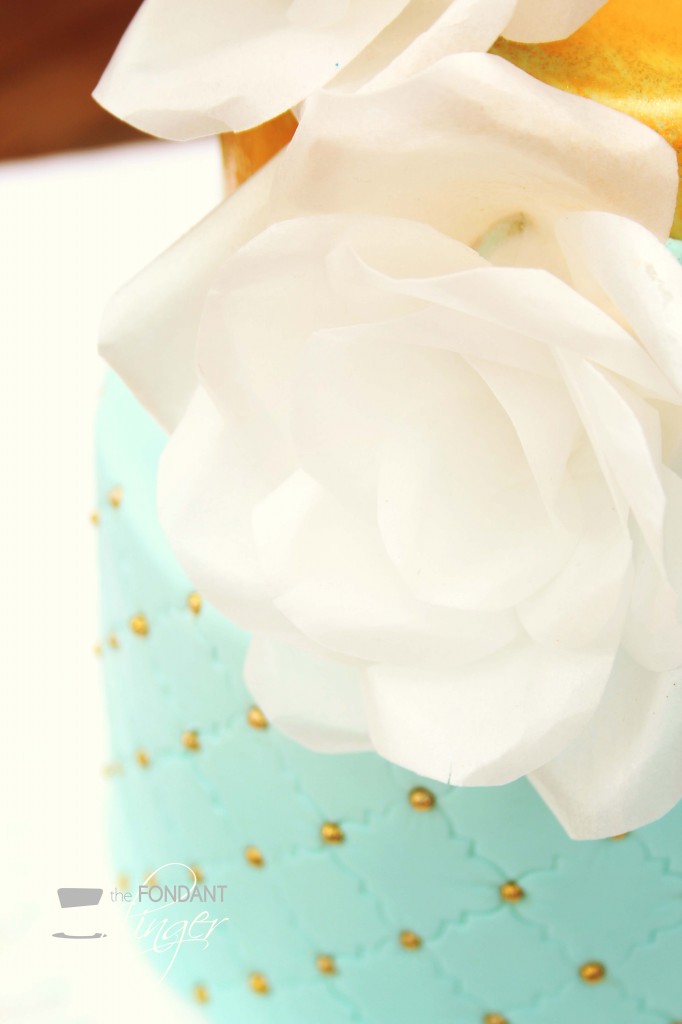
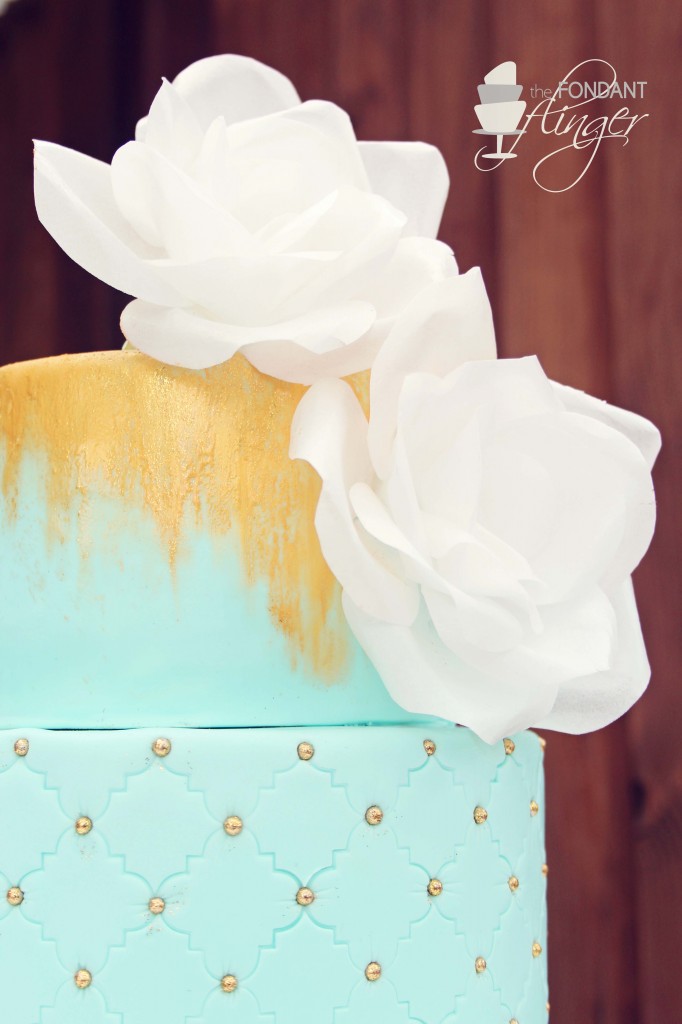
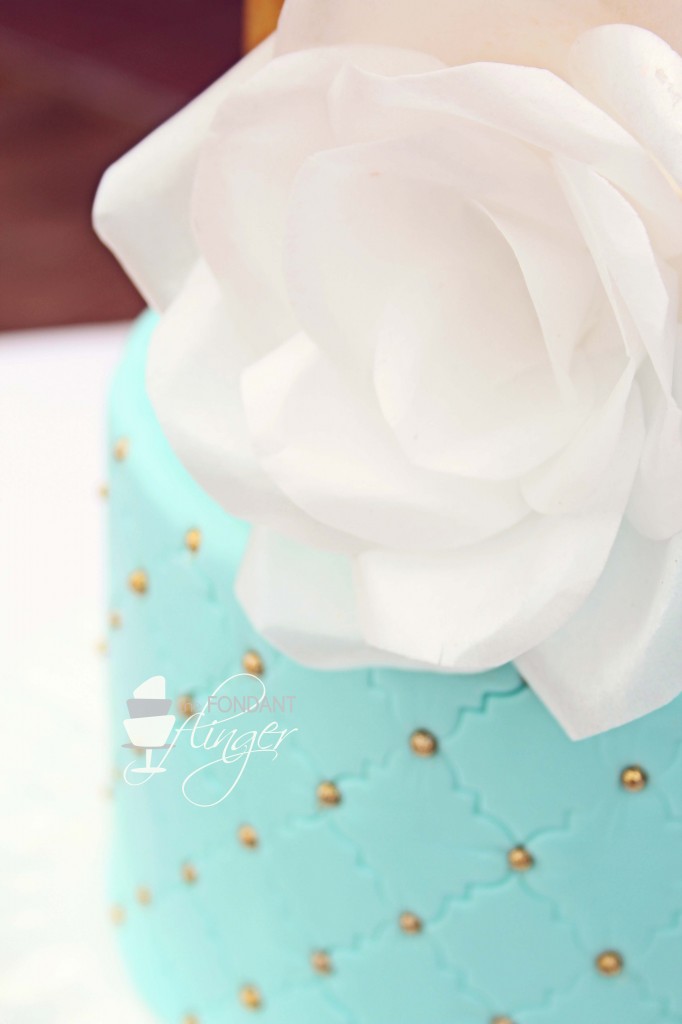
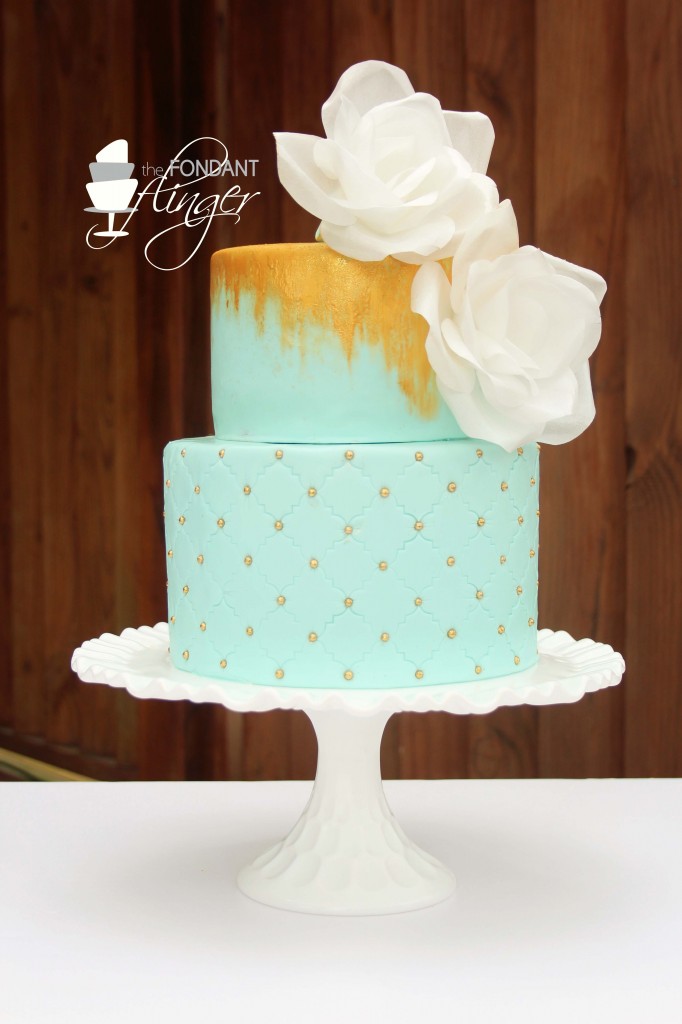
This cake was designed especially for a friend of mine so I knew that it had to be perfect. Fondant tinted to the perfect shade of sea foam was indented on the first tier with a small quatrefoil cutter from Not Just Cakes By Annie. The sugar pearls were tinted gold as well with a bit of gold disco dust and set into the fondant between the quatrefoils. Using a dry brush, I hand painted the gold “dripping” on the top tier of the cake and topped the cake with two offset wafer paper roses. FYI, I learned the wafer paper roses from the amazing Stevi of Hey, There Cupcake in her class on Craftsy.
I knew Becca loved Hummingbird cake (which is also what she had for her wedding cake) so the bottom tier was a Hummingbird cake with white chocolate cream cheese swiss meringue buttercream and the top tier consisted of chocolate rum cake and a whipped ganache swiss meringue buttercream.
Happy birthday, Becca!


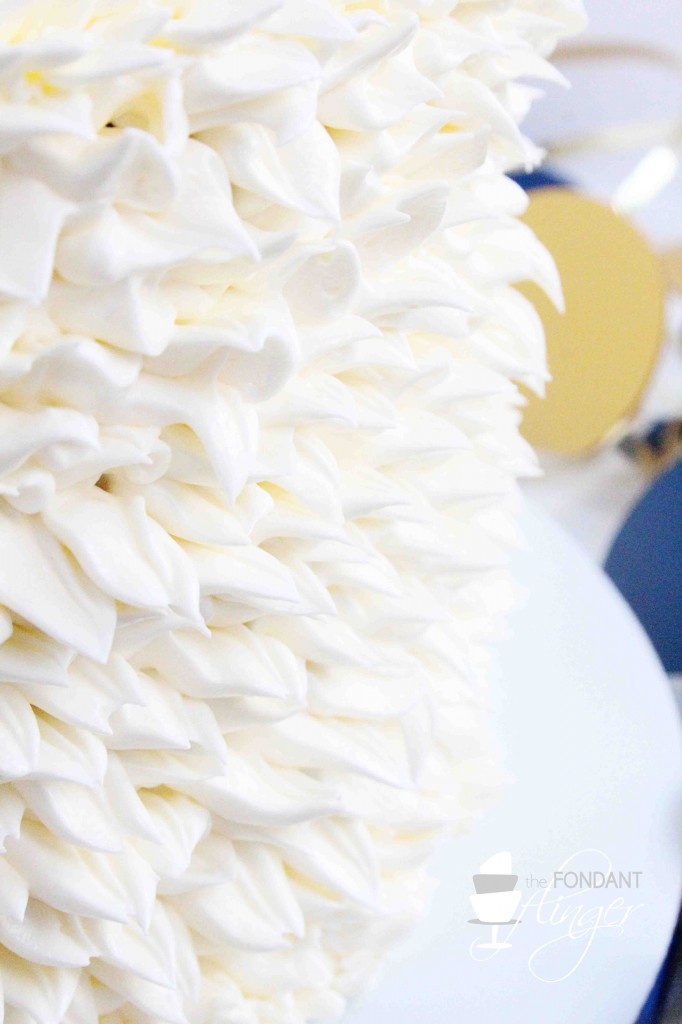
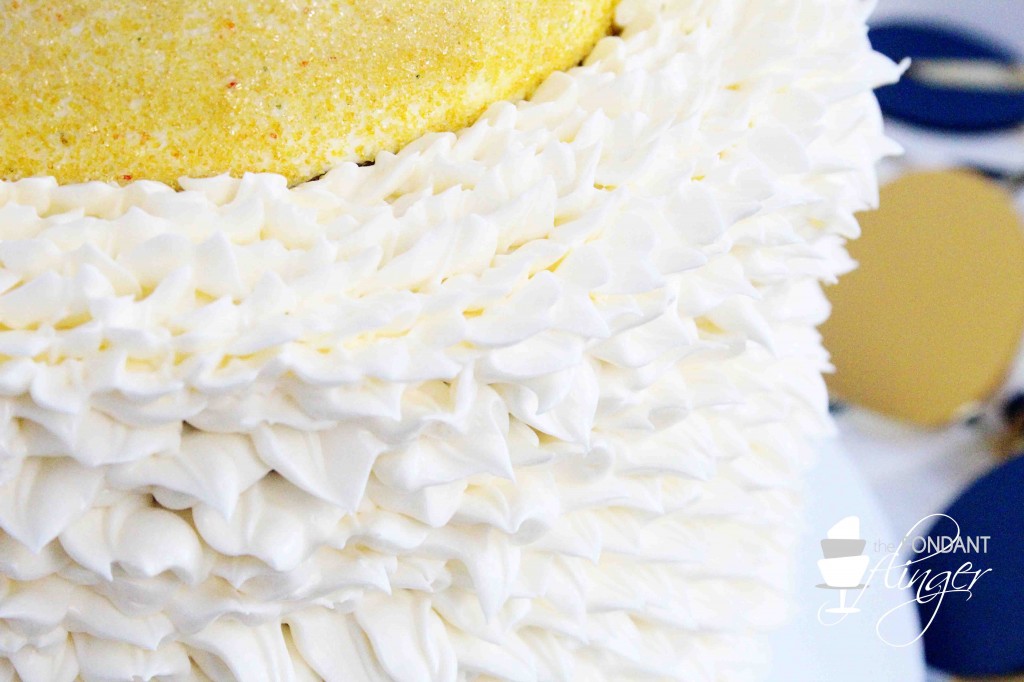
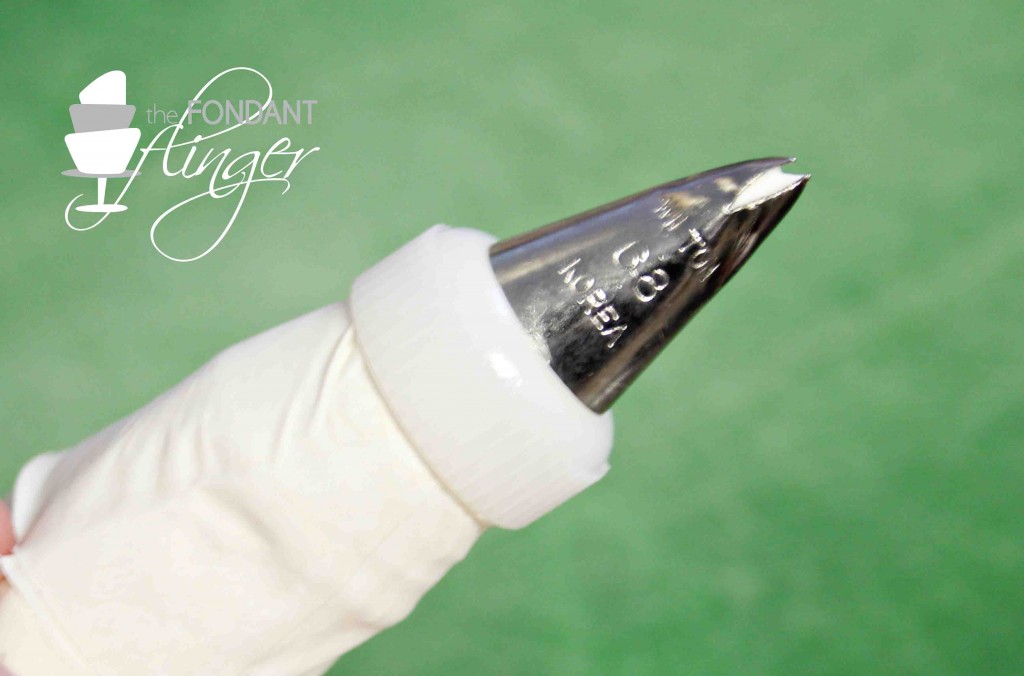
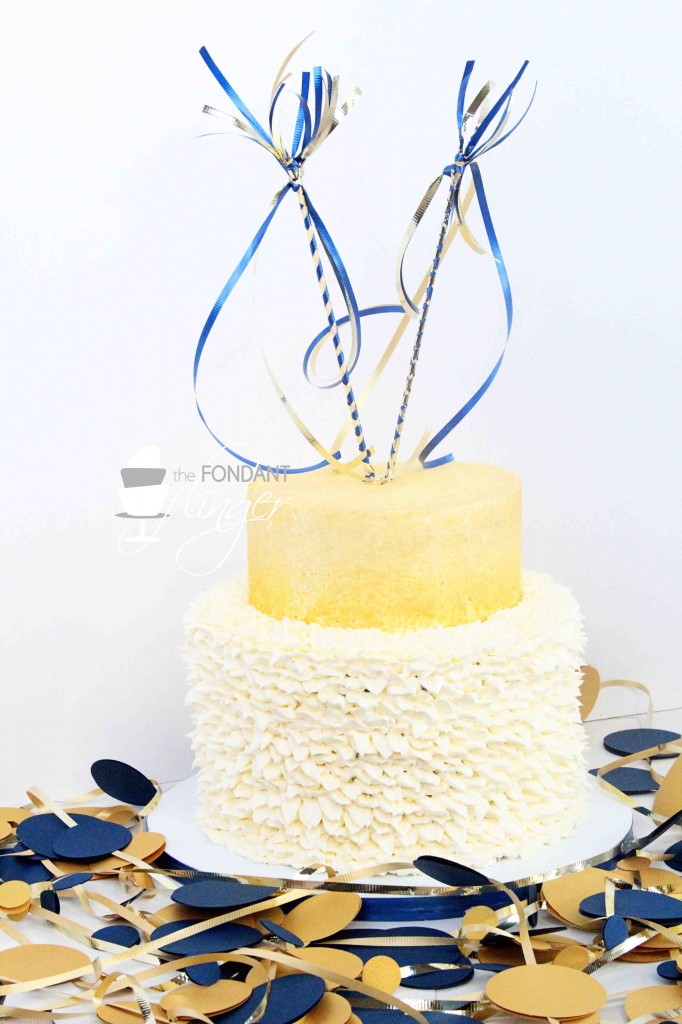
Ah, the leaf tip. Its just such a versatile piping tip and one I’ve been using quite a bit these past months. Most recently, I used it on this cake as part of a large dessert table for a church event.

I’ve used this technique on a few of my cakes so far and it is perfect for when the budget may be smaller or time does not allow for a full fondant ruffle technique done on an entire tier.

Its very similar to the technique used on my “Welcoming Spring” cake (below), however the angle of the tip is altered so that the tip is pulled up vertically, there was a bit more ruffling done during the piping and the rows are done a bit different to create the overall look of grass sprouting upward.
For the Great Gatsby cakes that were created earlier this year, the “feathery” look of the buttercream was achieved with the same leaf tip. I wanted to play off of the gum paste feathers that were painted gold and used as accents so with a quick change of the angle, the piped feathers were formed. Instead of pulling the piping bag up and slightly ruffling each one, I pulled the tip straight out from the cake and completed the rows in that way so that the tips of the “feathers” were predominately what you saw when viewing the cake.
Clearly, the color of the buttercream plays a tremendous role in varying the look of the cake as well.
Basically the only thing I changed for this past weekend’s cake for a dessert table is the top portion. Instead of pulling the leaf tip straight out from the sides of the next tier, I pulled them up vertically to give the cake a bit more “poofiness” (that’s a word, right?).
I used a Wilton leaf tip.
 And when I got to the top of the cake after piping the feathers, I began making each leaf more vertical (sorry for the not so great photo. My hand had quite a bit of shakiness after all that piping!).
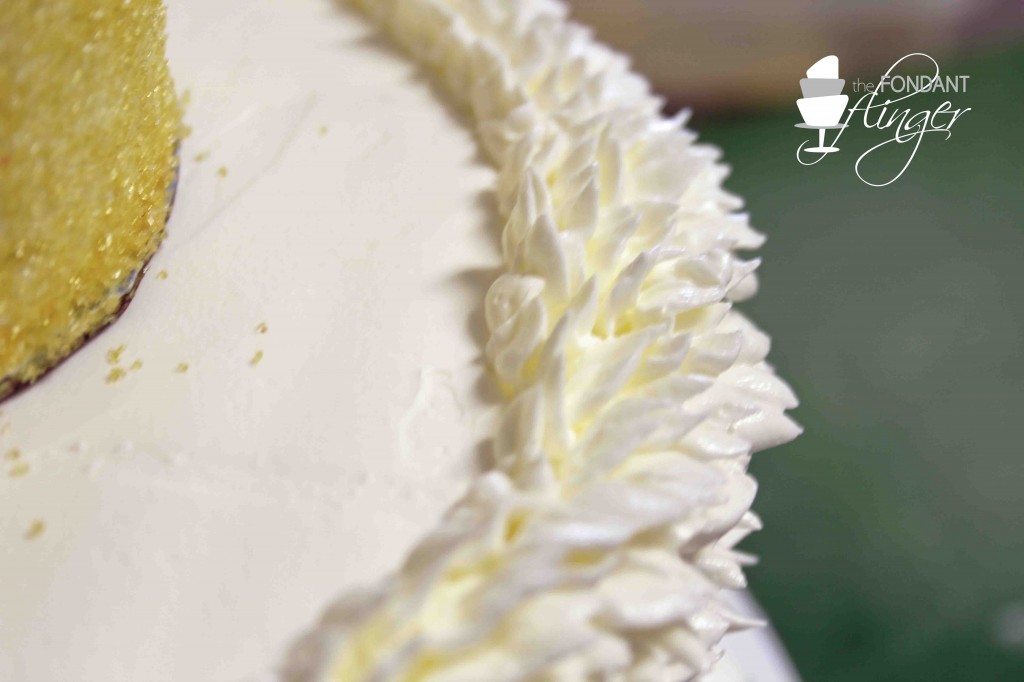 When it was done, it gave the cake a full and textured appearance .
 If you have any questions, please comment below and I’ll do my best to walk you through.
Happy caking all!
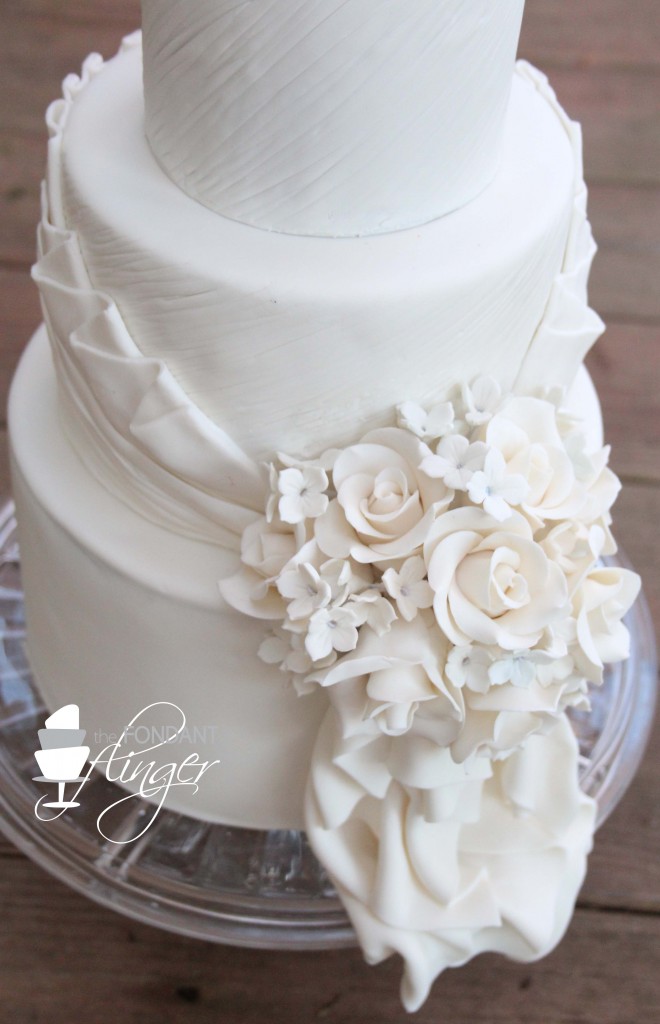
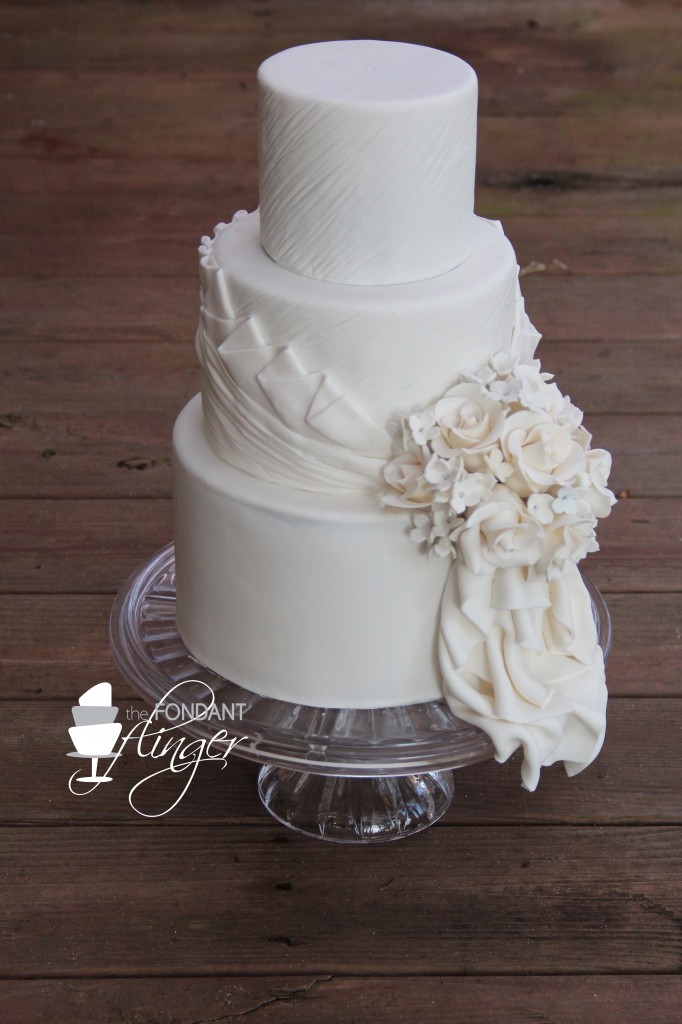
I just celebrated 12 years of marriage yesterday to my soulmate and best friend. I remember very fondly planning every detail of our big day while being completely lovesick with my brown eyed surfer. Believe it or not, the oversight in our wedding planning was in fact, the wedding cake. At this point, making and decorating cakes was the furthest thing from my mind so I left it to the experts. I gave them my preferences of “square” with “bamboo and orchid” details and didn’t give the order another thought. Then at the reception, I saw the monstrosity of a wedding cake that sadly was mine. A disproportionate round basket weave cake with plastic pillars and that tasted like 5 day old cornbread. All of the other memories surrounding my wedding day are wonderful….but then, there is that one photo of us with forced smiles next to the ugliest cake in the world. Perhaps its from this dessert tragedy in my own life that prompted me to go into creating gorgeous cakes. In any case, when my bride Cecelia contacted me about creating her dream wedding cake, I was determined to give her better memories that I had of my botched basket weave blunder.

Cecelia has seen a smaller version of this cake that I had done back when we were in Kodiak, Alaska. That cake, was in fact, my first wedding cake for a wonderful couple. The cake was designed then to match the bride’s gown and her bouquet. With a few minor adjustments, this cake was just perfect for Cecelia and her groom. A very fun part of this cake is actually what’s inside; layers of chocolate rum cake, dark chocolate ganache and a cherry compote swiss meringue buttercream. The combination was a hit at the reception and I received a text very soon after the event describing their joy surrounding their cake. I’m always delighted when I get such rave reviews…thank you, Cecelia and congratulations on your wedding. I hope your wedding cake memories always bring you happiness!
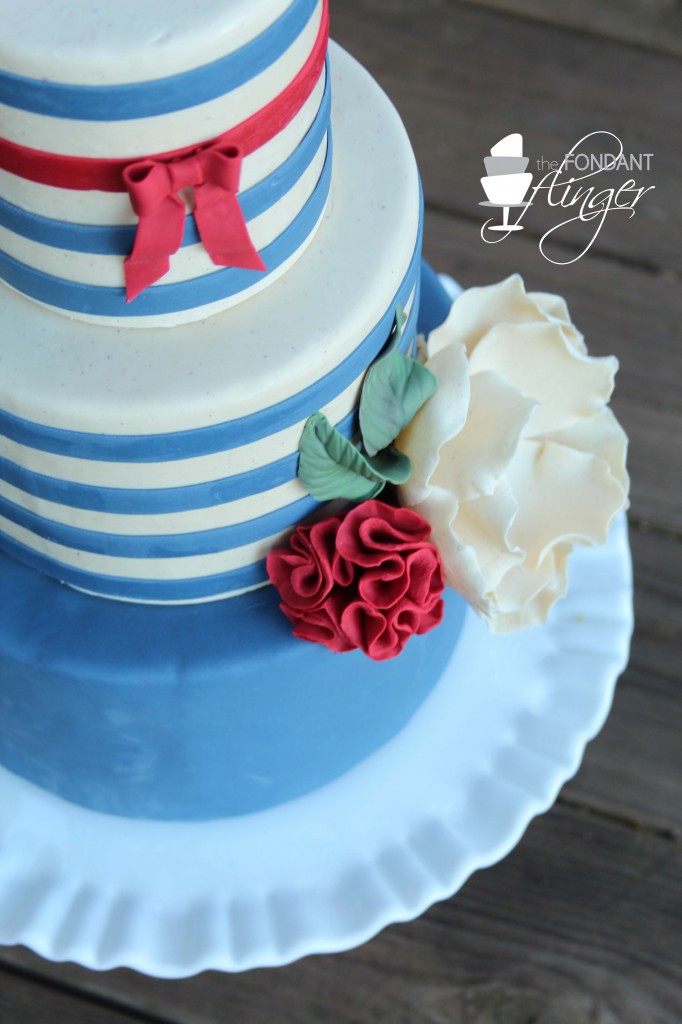
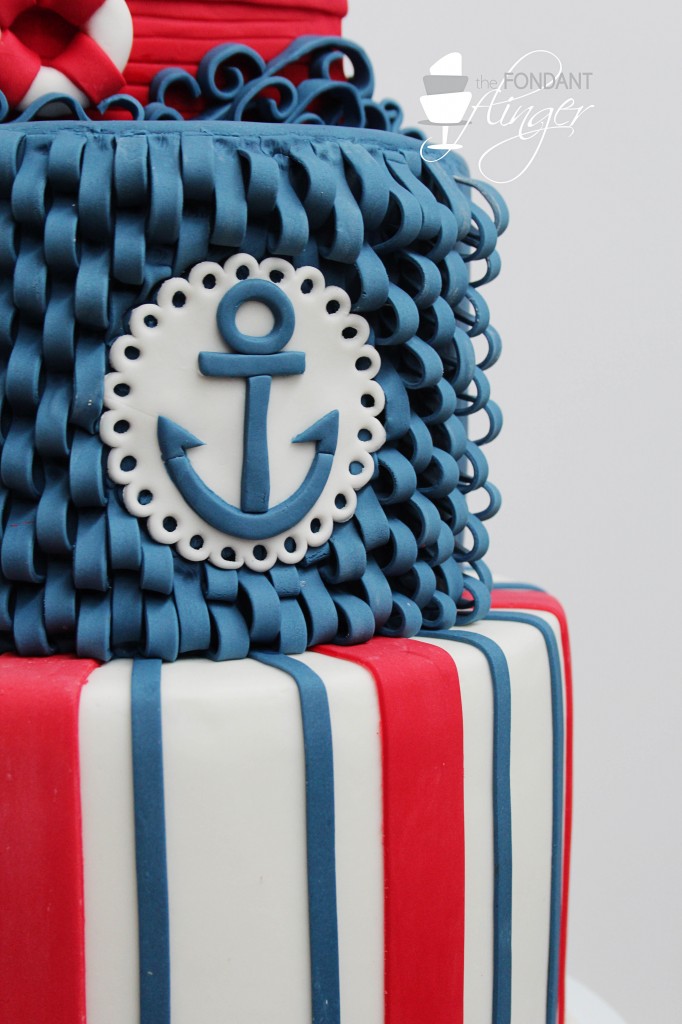
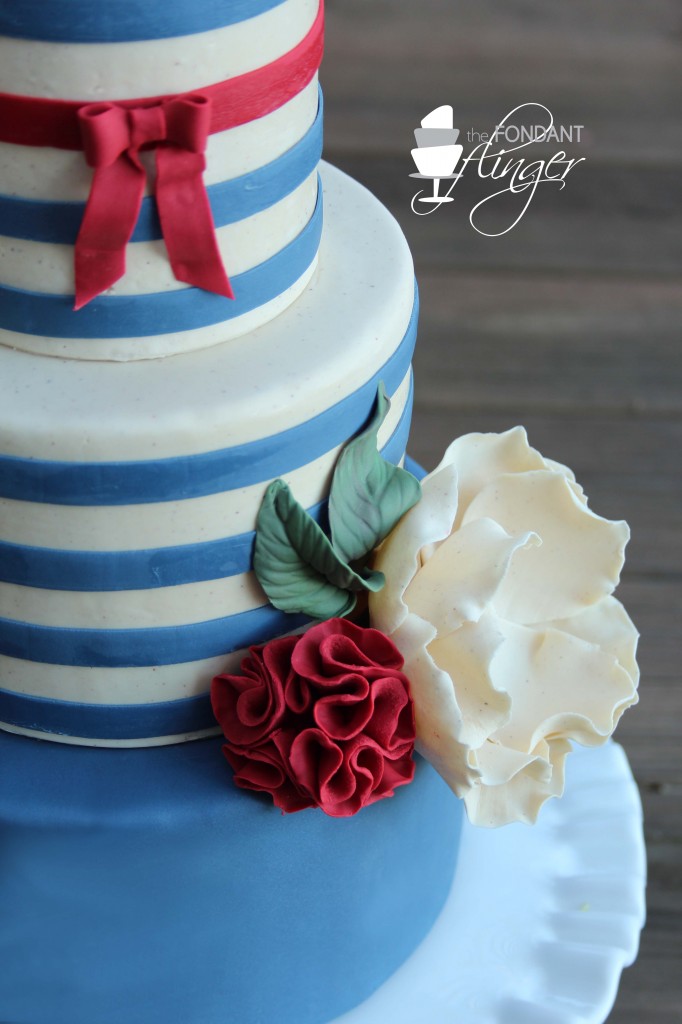
Some days inspiration can appear in odd ways. While browsing Etsy for baby girl gifts, I stumbled upon quite possibly THE most adorable pair of little girl shoes. They were natural colored canvas with blue striping and the toes adorned with a cluster of flowers. After daydreaming for a few minutes on how much fun having a baby girl would be, this cake design popped into my head and voila! This little star was born….which reminds me that I never did end up getting that baby girl gift. The trouble with inspiration is that it often makes me completely neglect any other thought processes until the project is complete. Today, I’ll head back to Etsy where inevitably, I’ll find some other inspiring piece and, again, forget to get the baby gift ordered.
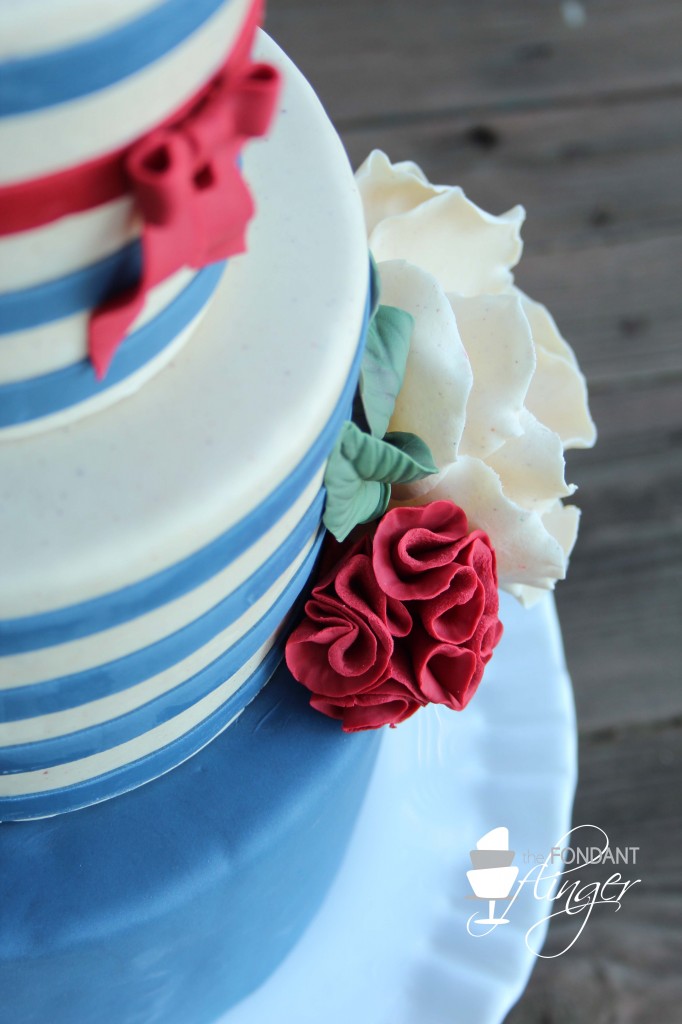
I mixed some gum paste with a bit of spices to get the canvas color and the appearance of small variations in color. Since the flowers were inspired by flowers made from material, I didn’t use any petal dust or highlighting but instead left them bare. The bright red pompom was exactly the “punch” of color that I wanted for the mid off-center focal point. And by mixing in a just a smidge of the red and blue into the green, I was able to get a coordinating green. Again, I was not trying to achieve realistic flowers or leaves so no highlighting was done on these guys with petal dust.

I mixed a batch of fondant in the same way that I mixed the “canvas” gum paste and covered the top two tiers. Using Jessicakes’ technique for the application, I finished off the top two tiers with striping. At first, I had all blue striping on the cake but it just seemed to need something else. So, I swapped out one blue stripe for a red one, added a bow and some dangling ribbons and was giddy at the outcome.
![]() I remember first seeing fondant work on the various cake decorating television shows and thinking “I can do that!” I bought a pack of fondant from the local Walmart and dove into the world of sugar shaping with the creation of my son’s 2nd birthday cake. I haven’t looked back since and fondant flinging has become my wonderful obsession. [Read More …]
I remember first seeing fondant work on the various cake decorating television shows and thinking “I can do that!” I bought a pack of fondant from the local Walmart and dove into the world of sugar shaping with the creation of my son’s 2nd birthday cake. I haven’t looked back since and fondant flinging has become my wonderful obsession. [Read More …]


 Fondant Flinger receives compensation for these endorsements from Craftsy and Minted.